

There’s something magical about the aroma of sizzling spices and perfectly seasoned ground beef wafting through your kitchen. Enter Beef and Bean Chimichangas —a Tex-Mex classic that’s equal parts comforting and irresistible. Imagine crispy, golden tortillas stuffed with a hearty filling of savory beef, creamy beans, and melted cheese, all topped with your favorite fixings like zesty salsa, cool sour cream, or creamy guacamole. Sounds amazing, right?
This dish is more than just a meal—it’s an experience. Whether you’re hosting a family dinner, prepping for a game night, or simply craving something indulgent yet simple to make, these chimichangas have got you covered. And here’s the best part: they’re completely customizable. Love spice? Add a dash of cayenne. Prefer a lighter option? Bake them instead of frying.
In this recipe, we’ll guide you step-by-step to create these crispy, cheesy masterpieces with ease. Plus, we’ll share tips to ensure your chimichangas turn out perfectly every time—crispy on the outside, gooey on the inside. So grab your apron, and let’s bring a taste of Tex-Mex comfort to your table!
Why You’ll Love This Recipe
- Quick and Easy: Perfect for busy weeknights or last-minute cravings.
- Family-Friendly: A crowd-pleaser that even picky eaters will adore.
- Versatile: Customize with your favorite toppings or dietary tweaks.
- Comfort Food at Its Finest: Rich flavors and satisfying textures in every bite.
With this recipe, you’re not just making dinner—you’re creating memories. Ready to get started? Let’s dive into the delicious details!
Key Benefits
Why should you add Beef and Bean Chimichangas to your recipe repertoire? Let me tell you—it’s not just about the incredible taste (though that’s reason enough!). These chimichangas are packed with perks that make them a standout dish for any occasion. Whether you’re cooking for yourself, your family, or a group of friends, here’s why this recipe deserves a spot in your kitchen:
1. A Crowd-Pleasing Comfort Food Classic
There’s something undeniably satisfying about biting into a crispy, golden chimichanga filled with savory beef, creamy beans, and melted cheese. It’s the ultimate comfort food that brings everyone together—perfect for game nights, potlucks, or even a cozy dinner at home.
2. Quick and Easy to Make
Life gets busy, but that doesn’t mean you have to sacrifice flavor. This recipe comes together in under an hour, making it ideal for weeknight dinners. With simple steps and minimal prep, you’ll have a restaurant-quality meal on the table in no time.
3. Fully Customizable to Suit Your Taste
Love spice? Add a pinch of cayenne or a dash of hot sauce to the filling. Prefer a healthier option? Swap deep frying for baking—your chimichangas will still come out crispy and delicious. You can even experiment with toppings like pico de gallo, avocado slices, or jalapeños to make it your own.
4. Perfect for Meal Prep or Freezing
Cooking for one? No problem. This recipe makes excellent leftovers, and the flavors only get better the next day. Plus, you can freeze assembled chimichangas for up to three months, giving you a quick, reheatable meal whenever you need it.
5. A Family-Friendly Favorite
Kids and adults alike will love these handheld delights. The combination of cheesy, meaty filling wrapped in a crispy tortilla is universally appealing. Serve them with a side of rice, beans, or a fresh salad for a complete meal that everyone will rave about.
6. Elevate Your Tex-Mex Game
If you’ve ever wanted to master a classic Tex-Mex dish, this is it. With its bold flavors and satisfying textures, these chimichangas are sure to become a staple in your culinary lineup. Plus, they’re a great way to introduce friends and family to the magic of homemade Mexican-inspired cuisine.
Ingredients
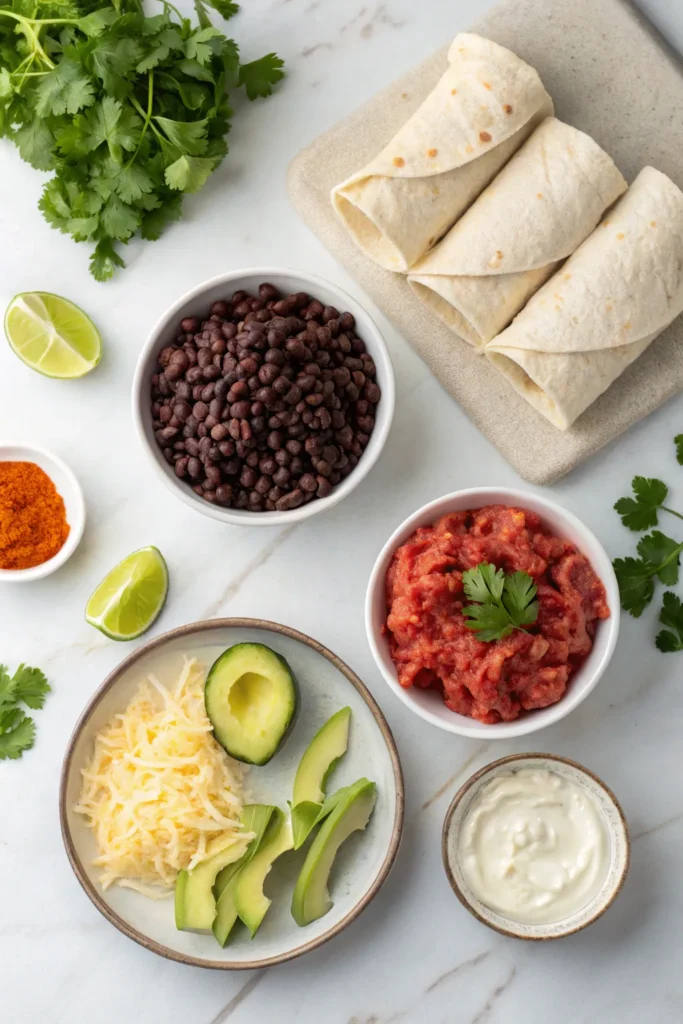
Now that you’re ready to bring this Beef and Bean Chimichangas Recipe to life, let’s talk ingredients. The beauty of this dish lies in its simplicity—you likely already have most of these staples in your pantry. Here’s everything you’ll need, grouped for easy prep:
For the Filling:
- 1 lb ground beef (or ground turkey/chicken for a lighter option)
- 1 can (15 oz) black beans , drained and rinsed (pinto beans work too!)
- 1 tsp cumin (for that authentic Tex-Mex flavor)
- 1 tsp chili powder (adjust to taste if you like it spicier)
- 1/2 tsp garlic powder (or fresh minced garlic for extra punch)
- 1/2 tsp onion powder (a must for depth of flavor)
- Salt and pepper to taste
- 1 cup shredded cheese (cheddar or Monterey Jack are classic choices)
For Assembly:
- 4–6 large flour tortillas (use gluten-free tortillas if needed)
- 2 tbsp vegetable oil (for frying—or skip for baking)
For Toppings (Optional but Highly Recommended):
- Sour cream (a cooling contrast to the crispy exterior)
- Salsa (fresh pico de gallo or your favorite store-bought version)
- Guacamole or sliced avocado (creamy and fresh)
- Shredded lettuce (adds a nice crunch)
- Extra cheese (because you can never have too much!)
Why These Ingredients Work Together
This combination of ingredients is a match made in culinary heaven. The ground beef provides a savory base, while the black beans add creaminess and fiber, making the dish more filling. Spices like cumin and chili powder give it that signature Tex-Mex kick, and the cheese ties it all together with gooey, melty goodness.
Pro Tip: If you’re feeling adventurous, toss in some diced green chilies or a splash of lime juice to brighten up the filling. And don’t forget—those toppings aren’t just extras; they’re what take these chimichangas from great to unforgettable.
How to Make Beef and Bean Chimichangas Recipe
Now that you’ve gathered your ingredients, it’s time to roll up your sleeves and dive into the fun part—making these crispy, cheesy Beef and Bean Chimichangas . Don’t worry; I’ll guide you step-by-step so you can achieve restaurant-quality results right in your own kitchen. Let’s get started!
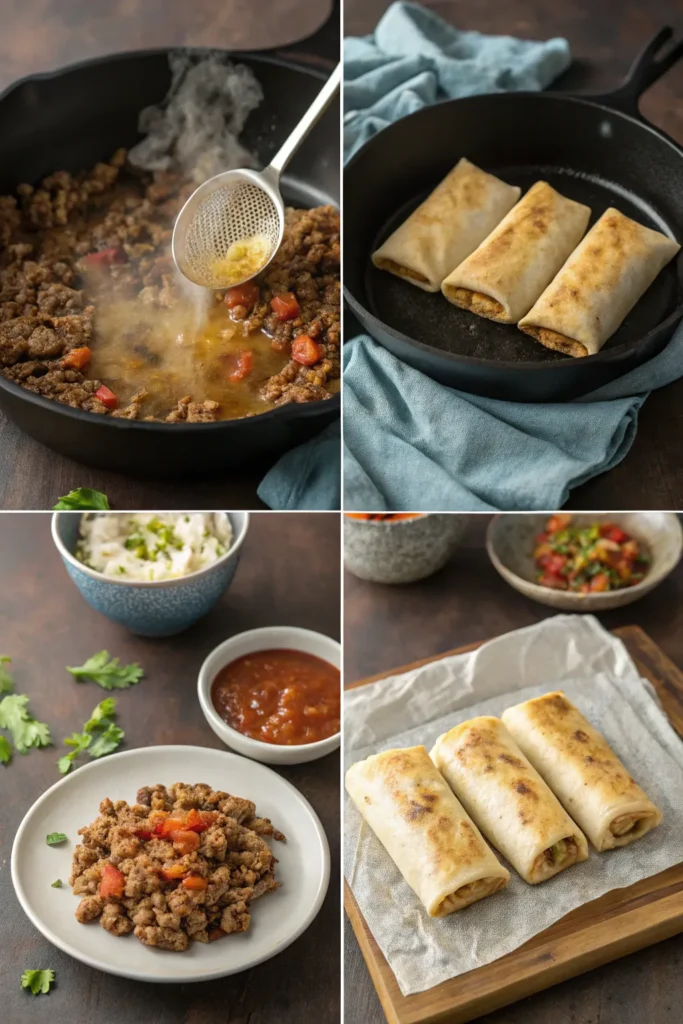
Step 1: Prepare the Filling
- Heat a large skillet over medium heat and add a drizzle of oil (or skip for a leaner option).
- Add 1 lb ground beef to the skillet, breaking it up with a wooden spoon as it cooks.
- Once the beef is browned, drain any excess fat and return the skillet to the heat.
- Stir in 1 tsp cumin , 1 tsp chili powder , 1/2 tsp garlic powder , 1/2 tsp onion powder , and a pinch of salt and pepper. Mix well to coat the beef with the spices.
- Add 1 can of black beans (drained and rinsed) to the skillet. Cook for another 2–3 minutes, letting the flavors meld together. Remove from heat and stir in 1 cup shredded cheese until melted and gooey.
Pro Tip: Taste the filling as you go—you’re the boss of the seasoning! Adjust the spices or add a splash of lime juice for brightness if desired.
Step 2: Assemble the Chimichangas
- Lay out a large flour tortilla on a flat surface. Spoon about 1/2 cup of the beef and bean filling into the center of the tortilla.
- Sprinkle a little extra cheese on top (because why not?).
- Fold the sides of the tortilla inward, then roll it tightly from the bottom to form a snug burrito shape. Repeat with the remaining tortillas and filling.
Handy Hint: If the tortillas feel stiff, warm them slightly in the microwave for 10–15 seconds to make them more pliable and easier to fold.
Step 3: Fry or Bake the Chimichangas
- For Frying:
- Heat 2 tbsp vegetable oil in a large skillet over medium-high heat.
- Carefully place each assembled chimichanga seam-side down in the hot oil. Fry for 1–2 minutes per side, or until golden brown and crispy. Use tongs to flip gently.
- Transfer to a paper towel-lined plate to drain excess oil.
- For Baking (Healthier Option):
- Preheat your oven to 400°F (200°C) . Lightly grease a baking sheet or line it with parchment paper.
- Place the assembled chimichangas seam-side down on the sheet. Brush the tops lightly with oil or melted butter for extra crispiness.
- Bake for 15–20 minutes , flipping halfway through, until golden and crispy.
Why It Works: Whether you fry or bake, the goal is to achieve that irresistible crunch while keeping the inside warm and gooey. Both methods work beautifully, so choose what suits your lifestyle best!
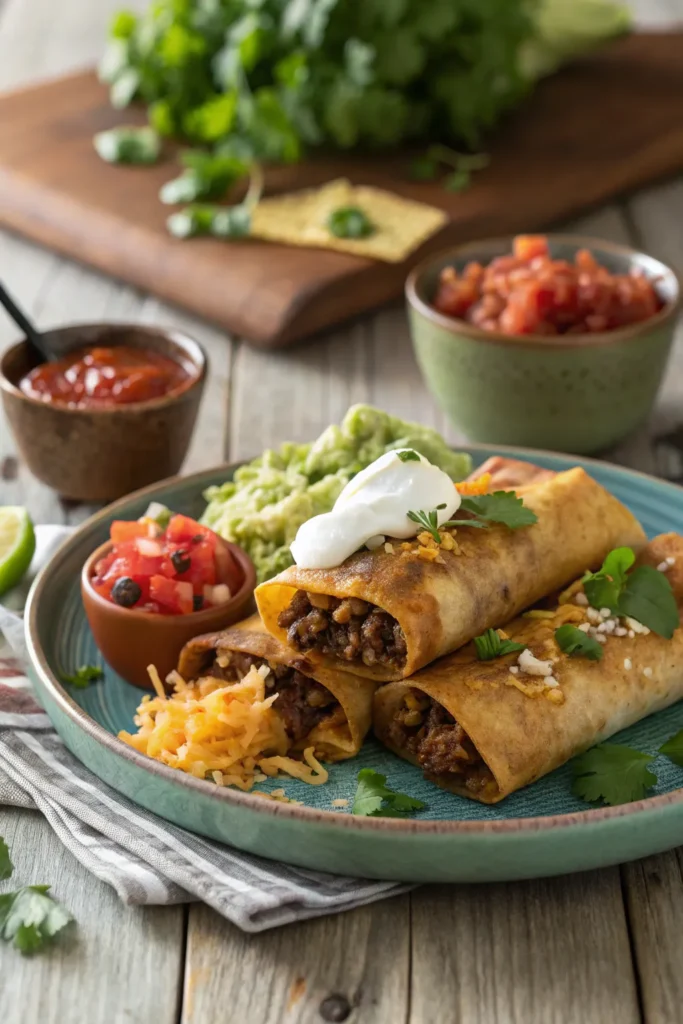
Step 4: Add the Finishing Touches
Once your chimichangas are golden and crispy, it’s time to dress them up. Serve with your favorite toppings like:
- A dollop of sour cream for creaminess
- A spoonful of salsa for tangy zest
- A sprinkle of shredded lettuce or fresh guacamole for freshness
These toppings aren’t just extras—they’re what take your chimichangas from good to “OMG, I need this in my life.”
Cooking Time & Servings
Now that you’ve mastered the art of making these crispy Beef and Bean Chimichangas , let’s talk logistics. Knowing the cooking time and servings will help you plan your meal like a pro—whether you’re whipping up dinner for two or feeding a hungry crowd. Here’s everything you need to know:
Cooking Time Breakdown
- Prep Time: 15 minutes
(This includes browning the beef, seasoning the filling, and assembling the chimichangas.) - Cook Time: 20 minutes
(Frying takes about 8–10 minutes total, while baking requires 15–20 minutes in the oven.) - Total Time: ~35 minutes
(Quick enough for a weeknight but special enough for the weekend!)
Pro Tip: If you’re short on time, prep the filling ahead of time and store it in the fridge. When you’re ready to cook, simply assemble and fry or bake!
Servings
This recipe makes 4–6 chimichangas , depending on how generously you fill them.
- For Smaller Appetites: This serves 6 people as part of a larger spread with sides like rice, beans, or salad.
- For Heartier Portions: It comfortably feeds 4 people as a standalone main dish.
Why This Matters
Understanding the timing and servings ensures you’re never caught off guard when planning meals. Whether you’re cooking for your family or hosting friends, this recipe is versatile enough to adapt to your needs. Plus, leftovers reheat beautifully, so don’t hesitate to make a double batch—you’ll thank yourself later!
Tips & Tricks
You’ve got the basics down, but let’s take your Beef and Bean Chimichangas to the next level with some insider tips and tricks. These little nuggets of wisdom will help you avoid common pitfalls, save time, and ensure your chimichangas turn out perfectly every time. Think of this as your cheat sheet for culinary success!
1. Prevent Bursting During Frying or Baking
- Seal the Edges: After folding your chimichangas, press the seams firmly to seal them shut. For extra security, dip your finger in water and run it along the edges before folding—this helps the tortilla stick together.
- Use Room-Temperature Tortillas: Cold tortillas are more likely to crack. Warm them slightly in the microwave or on a skillet for 10–15 seconds to make them pliable.
2. Achieve the Perfect Crispy Texture
- For Frying: Keep the oil at medium-high heat—not too hot, or the outside will burn before the inside heats through. Use tongs to gently flip the chimichangas halfway through for even browning.
- For Baking: Lightly brush the tortillas with oil or melted butter before baking. This mimics the frying effect and ensures a golden, crispy exterior without deep-frying.
3. Customize Like a Pro
- Spice It Up: Add diced jalapeños, green chilies, or a dash of cayenne to the filling for an extra kick.
- Go Veggie: Swap the ground beef for sautéed mushrooms, zucchini, or plant-based crumbles for a vegetarian twist.
- Cheese Options: Experiment with pepper jack cheese for a spicy note or queso fresco for a tangy finish.
4. Save Time Without Sacrificing Flavor
- Meal Prep Hack: Assemble the chimichangas ahead of time, wrap them tightly in plastic wrap, and store them in the fridge for up to 2 days. When ready to cook, simply fry or bake as directed.
- Freeze for Later: Place uncooked chimichangas on a baking sheet, freeze until solid, then transfer to a freezer-safe bag. They’ll keep for up to 3 months. Reheat directly from frozen by baking at 375°F (190°C) for 25–30 minutes.
5. Don’t Forget the Toppings
The toppings aren’t just an afterthought—they’re what make each bite sing! Here’s how to elevate your presentation:
- Drizzle sour cream in zigzag lines for a restaurant-worthy look.
- Add a sprinkle of fresh cilantro or chopped green onions for color and freshness.
- Serve with a side of warm salsa or guacamole for dipping.
Conclusion
And there you have it—your ultimate guide to mastering Beef and Bean Chimichangas , a dish that’s as comforting as it is delicious. Whether you’re frying them to golden perfection or baking them for a healthier twist, these crispy, cheesy bundles of joy are sure to become a household favorite.
What makes this recipe so special isn’t just the bold flavors or the satisfying crunch—it’s the way it brings people together. Picture this: a cozy dinner with your family, a game night with friends, or even a solo evening where you treat yourself to something truly indulgent. These chimichangas are more than just food; they’re an experience.
The best part? You can make them your own. Swap ingredients, adjust spice levels, or pile on your favorite toppings. This recipe is your canvas, and the possibilities are endless. And remember, whether you’re a seasoned cook or a beginner in the kitchen, this dish is designed to be approachable, foolproof, and downright fun to make.
So go ahead—grab those tortillas, fire up the skillet, and let the aroma of sizzling spices fill your home. Once you take that first bite, you’ll understand why Beef and Bean Chimichangas are a Tex-Mex classic worth perfecting.
FAQs
Let’s tackle some of the most common questions you might have about making Beef and Bean Chimichangas . Whether you’re wondering about substitutions, storage, or tips for success, I’ve got you covered. Think of this as your go-to guide for all things chimichanga-related!
1. Can I bake these instead of frying them?
Absolutely! Baking is a healthier alternative that still delivers crispy results. Simply brush the assembled chimichangas lightly with oil or melted butter, place them seam-side down on a baking sheet, and bake at 400°F (200°C) for 15–20 minutes , flipping halfway through. You’ll get that golden crunch without the extra oil.
2. What are the best toppings for chimichangas?
The beauty of chimichangas lies in their versatility! Here are some crowd-pleasers:
- Sour cream for creaminess
- Salsa or pico de gallo for tangy zest
- Guacamole or sliced avocado for freshness
- Shredded lettuce and cheese for crunch and flavor
Feel free to mix and match based on your mood—there’s no wrong way to top these!
3. How do I store leftovers?
Leftovers can be stored in an airtight container in the fridge for up to 3 days . To reheat, simply pop them in the oven at 350°F (175°C) for 10–15 minutes until warmed through. Avoid microwaving if you want to maintain that crispy texture.
4. Can I freeze chimichangas?
Yes, and it’s a game-changer for meal prep! Assemble the chimichangas, wrap them tightly in plastic wrap, and freeze them on a baking sheet. Once solid, transfer them to a freezer-safe bag. They’ll keep for up to 3 months . To reheat, bake directly from frozen at 375°F (190°C) for 25–30 minutes .
5. What can I substitute for beef?
If you’re not a fan of beef or want to try something different, here are some great alternatives:
- Ground turkey or chicken for a lighter option
- Plant-based crumbles for a vegetarian twist
- Shredded chicken or pork for a pre-cooked shortcut
Each option pairs beautifully with the beans and spices, so feel free to experiment.
6. Why did my tortilla crack while folding?
Cracking usually happens when the tortillas are too cold or dry. To prevent this, warm them slightly in the microwave or on a skillet for 10–15 seconds before assembling. You can also dip your finger in water and run it along the edges to help them seal better.
7. Can I make these spicier?
Of course! If you love heat, here are a few ways to amp up the spice:
- Add diced jalapeños or green chilies to the filling.
- Use pepper jack cheese instead of cheddar or Monterey Jack.
- Sprinkle a pinch of cayenne pepper or red pepper flakes into the seasoning mix.
Just remember to taste as you go—you’re in control of the heat level!