
Have you ever craved a dish that’s crispy, juicy, and feels just a little fancy without requiring hours in the kitchen? Enter these Baked Chicken Cutlet Recipes , your new go-to for quick yet gourmet meals. Imagine tender chicken encased in a golden, crunchy coating—without the mess of frying—and ready in under 30 minutes. Whether you’re whipping up a healthy weeknight dinner or impressing guests with minimal effort, this recipe has got you covered. Best of all, it’s as versatile as it is delicious. So, are you ready to elevate your dinner game with these Baked Chicken Cutlet Recipes ? Let’s get started!”
Key Benefits
If you’re looking for a dish that’s equal parts quick, healthy, and impressive, these Baked Chicken Cutlets are about to become your new go-to. Whether you’re a busy home cook or just someone who loves whipping up meals that feel gourmet without the fuss, this recipe ticks all the boxes. Here’s why you’ll love it:
- Surprisingly Quick: From prep to plate, this dish comes together in under 30 minutes, making it perfect for hectic weeknights when time is of the essence.
- Light Yet Flavorful: Baking instead of frying keeps things healthier while still delivering that crave-worthy crispy texture. Plus, the seasoning options let you customize the flavor profile to suit your mood.
- Gourmet Appeal: With their golden crust and juicy interior, these chicken cutlets look and taste like they came straight from a high-end restaurant—but trust me, they’re surprisingly easy to make at home.
- Versatile Base: Serve them as a main dish, slice them for sandwiches, or even chop them up for salads. This recipe adapts beautifully to whatever you have planned.
And let’s not forget—this dish is as family-friendly as it is elegant. Kids will love the crispy coating, while adults will appreciate the thoughtful balance of flavor and simplicity. Best of all? Cleanup is a breeze since everything bakes on a single sheet pan. So grab your ingredients, because this quick yet gourmet baked chicken cutlet recipe is about to elevate your dinner game!
Ingredients
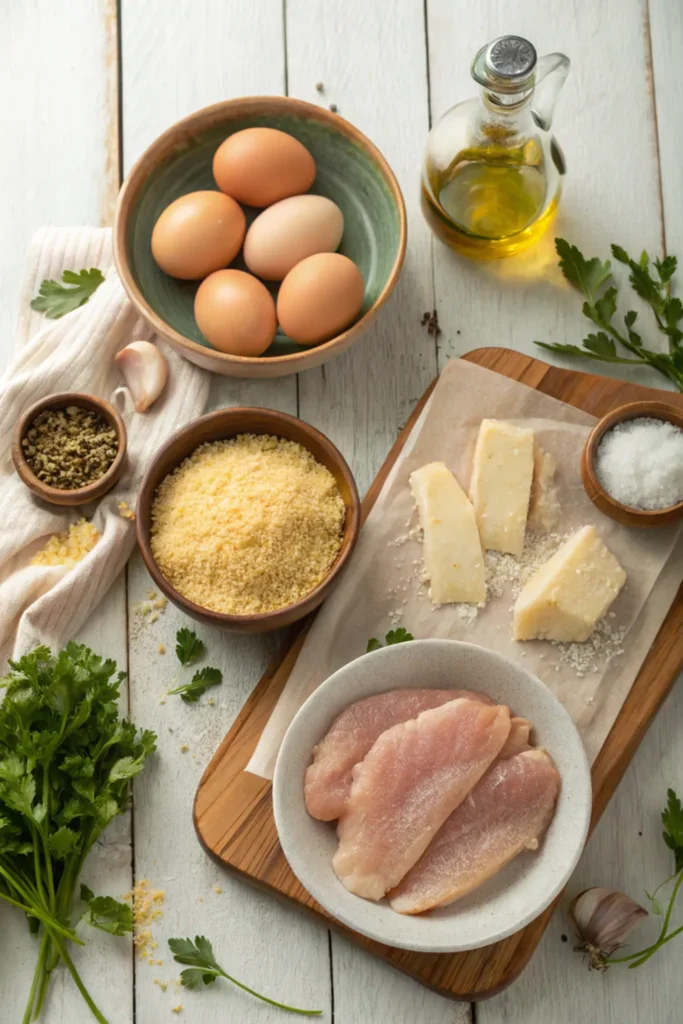
Now that you’re excited to make these Baked Chicken Cutlets , let’s gather everything you’ll need. The beauty of this recipe lies in its simplicity—most of these ingredients are likely already in your kitchen. Here’s what you’ll need to create a dish that’s crispy, juicy, and packed with flavor:
For the Chicken:
- 4 boneless, skinless chicken cutlets (or thinly sliced chicken breasts—if they’re thick, pound them thin for even cooking)
- Salt and freshly ground black pepper (to taste—a little seasoning goes a long way!)
- 1 teaspoon garlic powder (for a savory kick)
- 1 teaspoon paprika (optional, but adds a hint of smokiness and color)
For the Coating:
- 1 cup breadcrumbs (regular or panko for extra crunch—your choice!)
- ½ cup grated Parmesan cheese (because everything’s better with a little cheesy goodness)
- 1 teaspoon dried Italian herbs (oregano, thyme, or basil work beautifully)
- 2 large eggs (beaten with a splash of water for the perfect egg wash)
- 2 tablespoons olive oil (for drizzling—this helps achieve that golden, crispy crust)
Pro Tip:
If you’re aiming for a healthier twist, swap regular breadcrumbs for whole wheat or almond flour. For an extra burst of flavor, mix a pinch of red pepper flakes or lemon zest into the breadcrumb mixture—it’s a small tweak that makes a big difference.
With these simple, wholesome ingredients ready to go, you’re well on your way to creating a dish that’s as satisfying to make as it is to eat. Up next, we’ll walk through how to bring it all together step by step!
How to Make Baked Chicken Cutlet Recipes
Alright, let’s roll up our sleeves and get cooking! These Baked Chicken Cutlets are as easy to make as they are delicious. Follow these simple steps, and you’ll have a crispy, golden dish ready in no time. Think of me as your sous chef—here to guide you every step of the way.
Step 1: Prep Your Ingredients
- Start by seasoning your chicken cutlets with salt, pepper, garlic powder, and paprika. A light sprinkle is all you need to build flavor without overpowering the dish.
- If your chicken breasts are thick, place them between two sheets of plastic wrap or parchment paper and gently pound them to an even thickness (about ½ inch). This ensures they cook evenly and stay juicy.
Step 2: Set Up Your Breading Station
- Grab three shallow bowls:
- Bowl 1: Place the beaten eggs mixed with a splash of water.
- Bowl 2: Combine the breadcrumbs, Parmesan cheese, and dried Italian herbs.
- Bowl 3: Leave this empty for now—it’s just a staging area for your breaded cutlets.
Step 3: Bread the Chicken
- Dip each chicken cutlet into the egg wash, letting any excess drip off.
- Next, press it firmly into the breadcrumb mixture, ensuring an even coating on both sides. For extra crispiness, pat the crumbs onto the chicken with your fingers.
- Place the breaded cutlets on a plate or baking sheet while you finish the rest.
Step 4: Arrange and Bake
- Preheat your oven to 400°F (200°C) . Line a baking sheet with parchment paper or lightly grease it with olive oil to prevent sticking.
- Arrange the breaded chicken cutlets in a single layer on the baking sheet. Drizzle or lightly brush each piece with olive oil—this is the secret to achieving that irresistible golden crust.
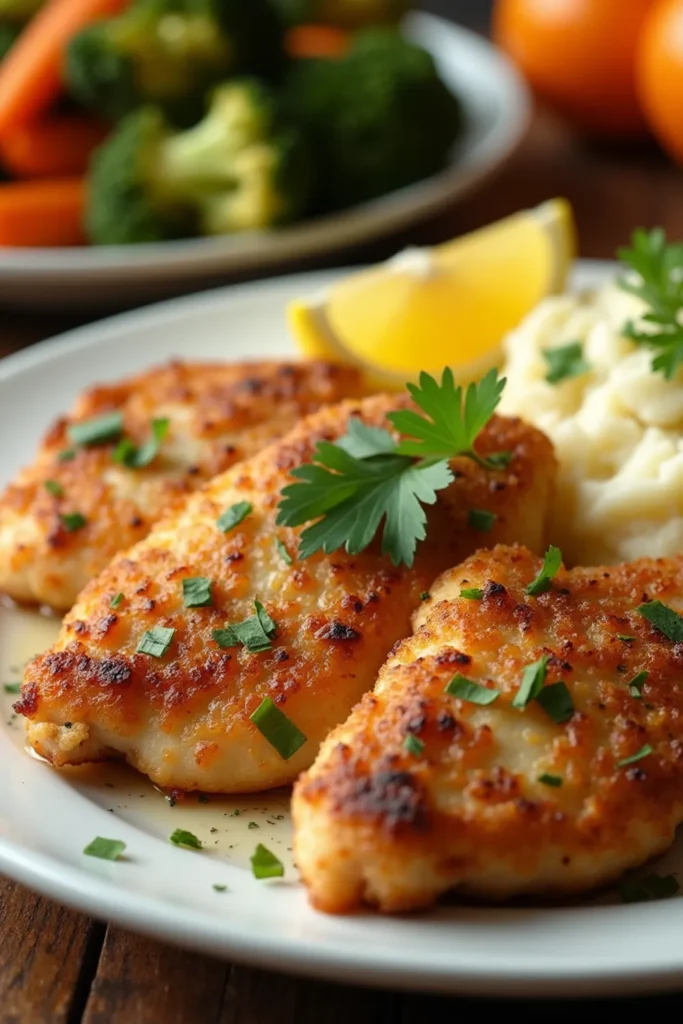
- Pop the baking sheet into the oven and bake for 15-20 minutes , flipping halfway through, until the chicken is cooked through (internal temperature should reach 165°F/75°C) and the coating is perfectly golden brown.
Pro Tip:
For an extra touch of elegance, garnish the baked cutlets with chopped fresh parsley or a squeeze of lemon juice before serving. It adds brightness and makes the dish feel restaurant-worthy.
And there you have it! Juicy, flavorful chicken encased in a crispy, golden crust—all without the mess of frying. Doesn’t that sound (and smell) amazing? Now, let’s talk about how to take this dish to the next level with some pro tips and variations.
Pro Tips and Variations
Every great recipe has room for a little creativity, and these Baked Chicken Cutlets are no exception. Whether you’re looking to tweak the dish for dietary needs, add your own flair, or save time on busy days, these tips and variations will help you make the recipe truly your own.
Pro Tips for Success:
- Double Up on Coating: For an ultra-crispy crust, dip the chicken in the egg wash and breadcrumb mixture twice. Just be sure to press firmly to help the coating stick.
- Use Panko Breadcrumbs: Swap regular breadcrumbs for panko to achieve an even crunchier texture—it’s a game-changer!
- Prevent Soggy Results: Make sure your baking sheet is lined with parchment paper or lightly greased. This ensures the chicken doesn’t stick and stays perfectly crisp.
Dietary Swaps:
- Gluten-Free Option: Use gluten-free breadcrumbs or almond flour for the coating—no one will notice the difference!
- Low-Fat Twist: Skip the olive oil drizzle and use cooking spray instead. The cutlets will still turn out golden and crispy.
- Cheese Alternatives: If you’re dairy-free, try nutritional yeast in place of Parmesan for a cheesy flavor without the dairy.
Flavor Boosters:
- Spice It Up: Add a pinch of cayenne pepper or smoked paprika to the breadcrumb mixture for a subtle kick.
- Citrus Zing: Mix lemon or orange zest into the breadcrumbs for a fresh, zesty note that pairs beautifully with the chicken.
- Herb Infusion: Fresh herbs like thyme, rosemary, or parsley can elevate the dish. Sprinkle some on top before serving for a pop of color and flavor.
Make It Kid-Friendly:
Kids love anything crispy and fun to eat, so this dish is already a winner. To make it even more appealing:
- Cut the chicken into smaller strips (think baked chicken tenders).
- Serve with dipping sauces like honey mustard, BBQ, or ranch for extra fun.
With these tips and tweaks, you can adapt this Baked Chicken Cutlet Recipe to suit any occasion, preference, or pantry situation. The best part? Every version is guaranteed to be delicious. So don’t be afraid to experiment—you might just discover your new favorite way to enjoy chicken!
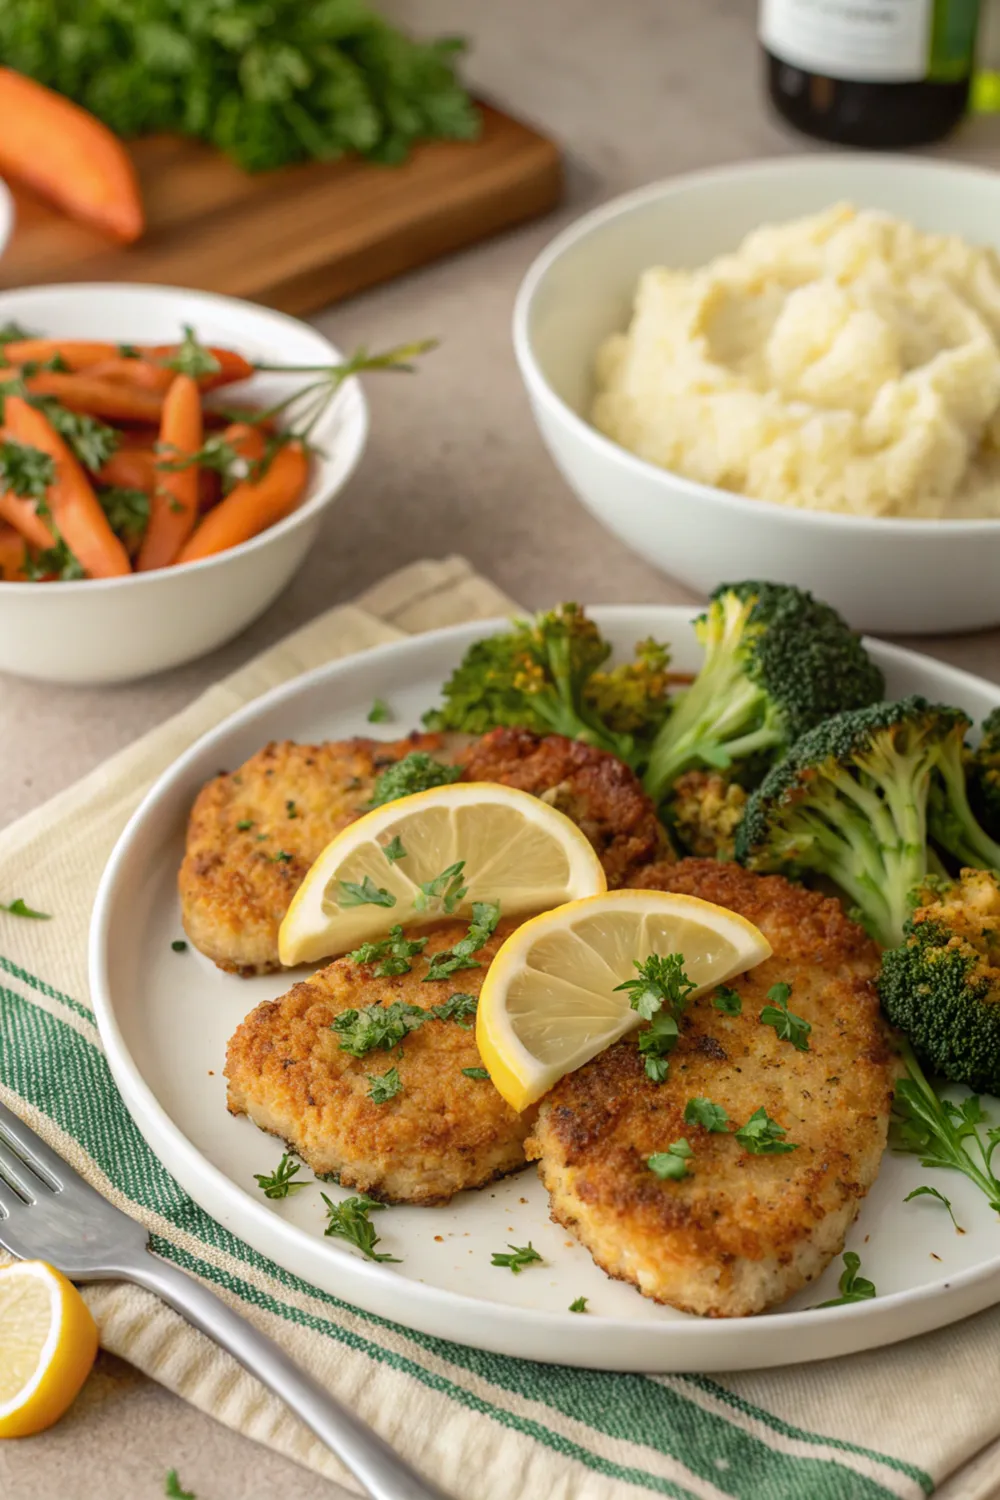
Serving Suggestions
Now that your Baked Chicken Cutlets are out of the oven, golden, and ready to impress, let’s talk about how to serve them in a way that makes the meal truly unforgettable. Pairing these crispy, juicy cutlets with the right sides and presentation can take your dinner from great to gourmet.
Perfect Side Dishes:
- Roasted Vegetables: Toss broccoli, carrots, or Brussels sprouts with olive oil, garlic, and a sprinkle of Parmesan for a healthy, flavorful complement.
- Creamy Mashed Potatoes: Serve the cutlets over a bed of buttery mashed potatoes for a comforting, hearty meal.
- Fresh Salad: A crisp arugula or spinach salad with cherry tomatoes, cucumbers, and a light vinaigrette balances the richness of the chicken.
- Rice or Quinoa: Pair the cutlets with fluffy basmati rice, wild rice, or nutty quinoa for a wholesome, filling option.
Presentation Tips:
- Garnish Like a Pro: Sprinkle chopped fresh parsley, chives, or a dusting of paprika on top before serving. It adds color and a touch of elegance.
- Sauce It Up: Drizzle a bit of lemon butter sauce, marinara, or a dollop of tzatziki over the chicken for extra flavor and flair.
- Family-Style Serving: Bring the entire baking sheet to the table for a rustic, cozy vibe. Just make sure to warn everyone—it’ll be piping hot!
Beverage Pairings:
- Wine Lovers: A glass of chilled Chardonnay or Sauvignon Blanc complements the dish beautifully. For red wine fans, try a light Pinot Noir.
- Non-Alcoholic Options: Sparkling water with a slice of lemon, iced tea, or a homemade lemonade keeps things refreshing and light.
Leftover Magic:
If you’re lucky enough to have leftovers (though we doubt there will be many!), this dish tastes even better the next day. Slice the cutlets and layer them into sandwiches, wraps, or salads for a quick and satisfying lunch.
By pairing these crispy, golden Baked Chicken Cutlets with thoughtful sides and a touch of creativity, you’ll create a meal that feels complete, balanced, and utterly satisfying. Now go ahead—serve it up and watch those smiles light up around the table!
Conclusion
There you have it—your very own Baked Chicken Cutlets , a dish that’s equal parts crispy, juicy, and effortless to prepare. Whether you’re cooking for family, friends, or just treating yourself to a delicious meal, this recipe proves that great food doesn’t have to be complicated. With its simple ingredients, easy steps, and endless possibilities for customization, it’s the kind of dish that makes you feel like a kitchen hero without breaking a sweat.
What I love most about this recipe is how versatile it is. It’s perfect for busy weeknights, yet impressive enough for special occasions. Plus, who can resist that golden, crunchy coating and the tender chicken underneath? Pair it with your favorite sides, serve it with a smile, and watch as everyone goes back for seconds (and maybe even thirds!).
So why wait? Grab those ingredients, preheat your oven, and give this recipe a try. Trust me—it’s one of those dishes that’ll earn a permanent spot in your recipe rotation. And hey, if you make it, don’t forget to share your experience. After all, good food is always better when it’s shared!
Happy cooking, and here’s to many delicious meals ahead!
FAQs
Got questions about making these Baked Chicken Cutlets ? Don’t worry—I’ve got you covered. Here are some of the most common queries (and their answers) to help you feel confident and prepared before diving into the kitchen.
Can I freeze baked chicken cutlets?
Absolutely! These cutlets freeze beautifully. Let them cool completely, then store them in an airtight container or freezer bag for up to 3 months. Reheat them in the oven at 350°F (175°C) for 10-15 minutes for best results.
What can I use instead of breadcrumbs?
If you’re out of breadcrumbs or avoiding them, try crushed crackers, panko, almond flour, or even crushed cornflakes. Each option adds a unique texture while keeping that crispy coating intact.
How long does it take to bake chicken cutlets?
Typically, these cutlets bake for 15-20 minutes at 400°F (200°C). If they’re thicker or you’ve doubled the breading, add a few extra minutes. Always check that the internal temperature reaches 165°F (75°C) to ensure they’re fully cooked.
Can I make this recipe ahead of time?
Yes, and it’s a great option for meal prep! Bread the chicken cutlets, arrange them on a baking sheet, cover, and refrigerate for up to 24 hours. When you’re ready to bake, just pop them in the oven—no need to thaw.
Is this dish kid-friendly?
You bet! Kids love the crispy coating and tender chicken. To make it even more appealing, cut the chicken into strips and serve with dipping sauces like BBQ, honey mustard, or ranch. It’s a guaranteed hit!
Can I use chicken thighs instead of cutlets?
Definitely! Chicken thighs work wonderfully and stay extra juicy. Just pound them thin like cutlets and adjust the cooking time slightly if they’re thicker.
What if I don’t have parchment paper?
No problem! Lightly grease your baking sheet with olive oil or cooking spray to prevent sticking. The key is to keep the cutlets from sitting in their juices so they stay crispy.